Craft it Yourself: 7 Easy Steps for Making Wooden Pumpkins
Hey there, pumpkin! Looking for fall décor that won’t leave your wallet full of cobwebs? Try these DIY wooden pumpkins!
Supplies
For this project, you’ll need:
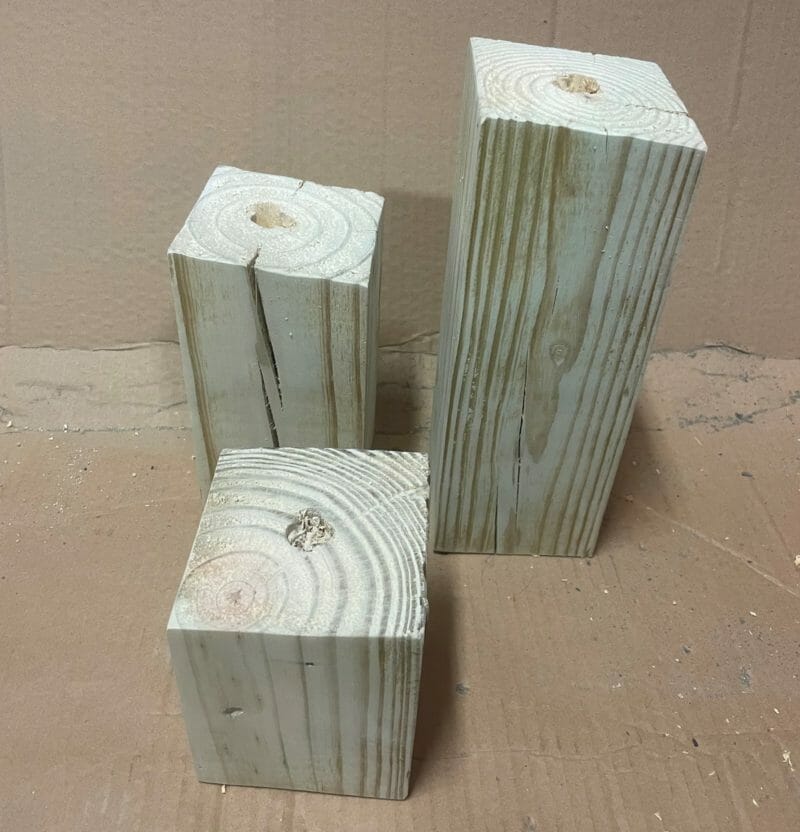
- 4×4 Pine posts
- Drill with 3/8 wood auger bit (a paddle bit will work as well)
- Twigs or small sticks
- 180 grit sand paper
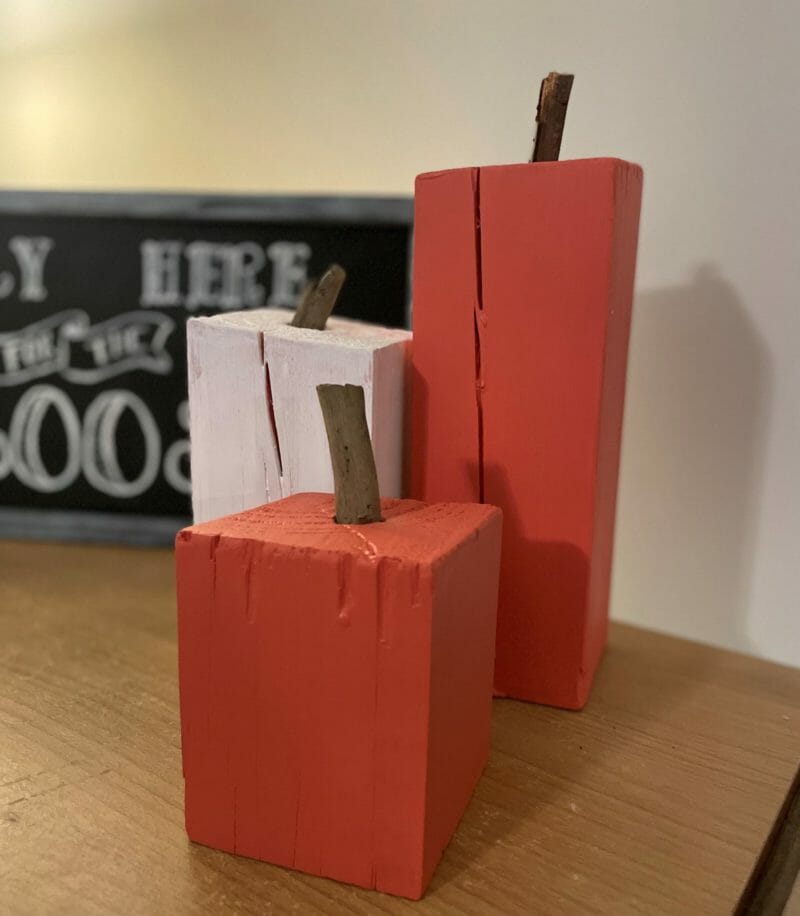
- General Finishes Persimmon Milk Paint
- General Finishes Snow White Milk Paint
- Foam brush(es)
- Stir stick
- Wood glue
It’s all in the prep…
1. Cut the 4×4 posts into sizes or your choosing. Anywhere from 3 to 12 inches will be fine. We used scrap wood we had left over from another project that was already cut into various sizes.
2. Drill holes in the top of the posts where the “stems” will go, about 1/2 inch or so deep. We used a 3/8 wood auger bit, but a paddle bit would work as well. Once drilled, you should check to make sure the holes are an appropriate size for the stems and adjust as needed.
3. Sand the posts with 180 grit sandpaper to smooth out any imperfections and allow the paint to adhere. We used a random orbital sander, but you can hand sand if need be.
4. Blow or wipe off sawdust to provide a surface that is clean, dry, and dull — ready for paint. Make sure to get the sawdust and wood scraps out of the stem holes before you start painting.
Let’s get to it — time to paint your wooden pumpkins!
5. Open your can of General Finishes Milk Paint and stir thoroughly with a stir stick. To keep the paints usable longer, we recommend opening only one can at a time.
6. Use your foam brush to apply to paint to the post. Avoid getting the paint in the stem hole if possible. Wait at least 2 hours before applying a second coat or handling.
7. Once you reach your desired color and the paint has dried, apply a couple beads of wood glue in the stem hole and push the twig in. Avoid picking up the pumpkins by the stems, especially if the wood glue hasn’t dried yet.
Wa-lah! Your wooden pumpkins are complete!
Need a little more?
You can also tie hemp twine or some ribbon to the stems to bring in some texture and/or color to your wooden pumpkins. You can tie the ribbon to the stems or use a couple beads of hot glue to attach it to another part of the pumpkin.
If you want to make your wooden pumpkins more of a Halloween decoration than just a fall decoration, you can use a stencil and a paint pen to add a Jack-O-Lantern face or another design of your choice.
Unlike chalk paint, General Finishes Milk Paint can be used exteriorly. However, you will need to topcoat it with a water-based exterior polyurethane, like General Finishes Exterior 450, for the pumpkins to last outside.
We’re fall-ing for wooden pumpkins!
We’d love to see the end result! Tag us in your photos @unfinishedofwilmington on Facebook, Instagram, and Pinterest.
Any questions? Feel free to contact us — we’re happy to help!